This post will focus on a practical selection of over-voltage protection components, their parameters, schematics and needed calculations. The tests' results are given at the end.
The standard over-voltage protection in the 3-4 digits handheld digital multimeters is build with a current limiting PTC, placed in series and voltage spike suppressor MOV, which is placed in parallel to the input buffer. When we are talking about 6+ digits DMM, this solution is not suitable due to the high current leakage of the PTC and the high resistance, current leakage and capacitance of the MOV.
For voltage protection up to 100V DC, ultra-low leakage diodes or JFET transistors can be used. For higher voltages, I think a Gas Discharge Tube (GDT) can be used due to their absent of the current leakage.
How over-voltage protection works

When the input voltage is greater than the positive (or less than the negative) voltage rail and the forward diode voltage, the diode will begin to conduct and the current will pass from the limiting resistor through the diode to the positive or negative power rail. The positive rail must sink the current and the negative rail must source the current.
There is one problem: when a standard LDO is used for positive rail, it can not sink a current. As a result, the current through the diode will increase the voltage on the positive rail and can damage the circuit under the protection.
There are two solutions to this problem: to use a buffer op-amp which can sink between several to tens mA or to use schematics I found during the op-amp selection from the ADA4177 datasheet - an PNP transistor which "re-routes" the current from the diode to the "sinking" ground. I tried the solution in the ADA4177 and it works perfectly.
If a dual-polarity power supply is used for the op-amp, the negative power rail will source the current through the diode and the voltage will not be increased when the input voltage exceeds the negative power rail.
The maximum input voltage is the sum of the power supply voltage and the continuous reverse voltage that can withstand the diode. The input voltage for the op-amp will be clamped to the following values:
- For the positive over-voltage: the sum of the positive power rail voltage, the diode's forward voltage and the base-emitter voltage of the PNP transistor.
- For the negative over-voltage: the sum of the positive power rail voltage and the forward voltage of the diode.
The clamping voltage must not exceed the maximum allowed power supply of the op-amp. Let's give one example with LTC2057HV that has spec of 60V supply peak to peak voltage (65V absolute maximum). If the op-amp is supplied with +/- 27V, this will give 60V-(2*27V)=6V maximum clamp above the positive or negative power rail. That means that maximum allowed value is +/-33V.
Component Selection
On the market there aren't so many diodes that have pA range leakage current. The few of them are: BAV199, BAS416 and PAD series diodes with guaranteed maximum values, but they are very expensive. The alternative is a JFET transistor like MMBF4117 with shortened drain and source pins.
Which parameters should you look at? Here is the list:
- "Reverse/leakage current" for diodes or "Gate to Source Reverse Current (IGSS)" for JFET transistors. The value should be in pA range, preferably less than 10pA.
- "Continuous reverse voltage" for diodes or "Gate to Source
Breakdown Voltage (V(BR)GSS)" for JFET transistors. The value should be as high as possible.
- "Continuous forward current (IF)" for diodes or "Continuous Forward Gate Current (IFG)" for JFET transistors. This is the maximum current which has to be limited by a serial resistor.
The maximum reverse voltage that can be applied is the power supply voltage and the maximum value of the diode's continuous reverse voltage. The current which will flow through the resistor and the diode is:
I limit = (Vin - (Vsupply + Vfwd + Vpnp*))/Rlimit
Where:
- Vin is the input voltage.
- Vsupply is the voltage on the power supply rail.
- Vfwd is the forward voltage of the protection diode.
- Vpnp is the optional base-emitter voltage if positive sink schematics is used.
- Rlimit is the value of the limiting resistor.
The limit current value must not exceed the maximum value of the diode's continuous forward current and the resistor's power rating has to be selected based on the current and the resistance.
The table below shows calculated data for the dual diode BAV199, the single diode BAS416 and the JFET transistor MMBFF4117. Two values of the limiting resistors are given - 2K and 10K.
Calculated values of noise and leakage voltage are shown in the last two rows in the table.
The RMS noise value is calculated based on relative high current noise density of 1pA/√Hz. Even with 10K limiting resistor, the noise is low and can be ignored.
However, the error due to current leakage of the whole front end which includes the reverse current of diodes and the input buffer can be significant. In the table, calculation shows that for 100pA total leakage which was my total error budget, the voltage error can be between 0.2 and 1uV respectively for 2K and 10K resistor. On the 1V range, this makes 0.2-1.0 ppm error.
The small value of the limit resistor is preferably, but this will increase the current. Maybe the 2K resistor is a good trade-off: the maximum error due to leakage of 100pA is 0.2uV and the resistor power is around 1W for the BAV199/BAS416.
The test
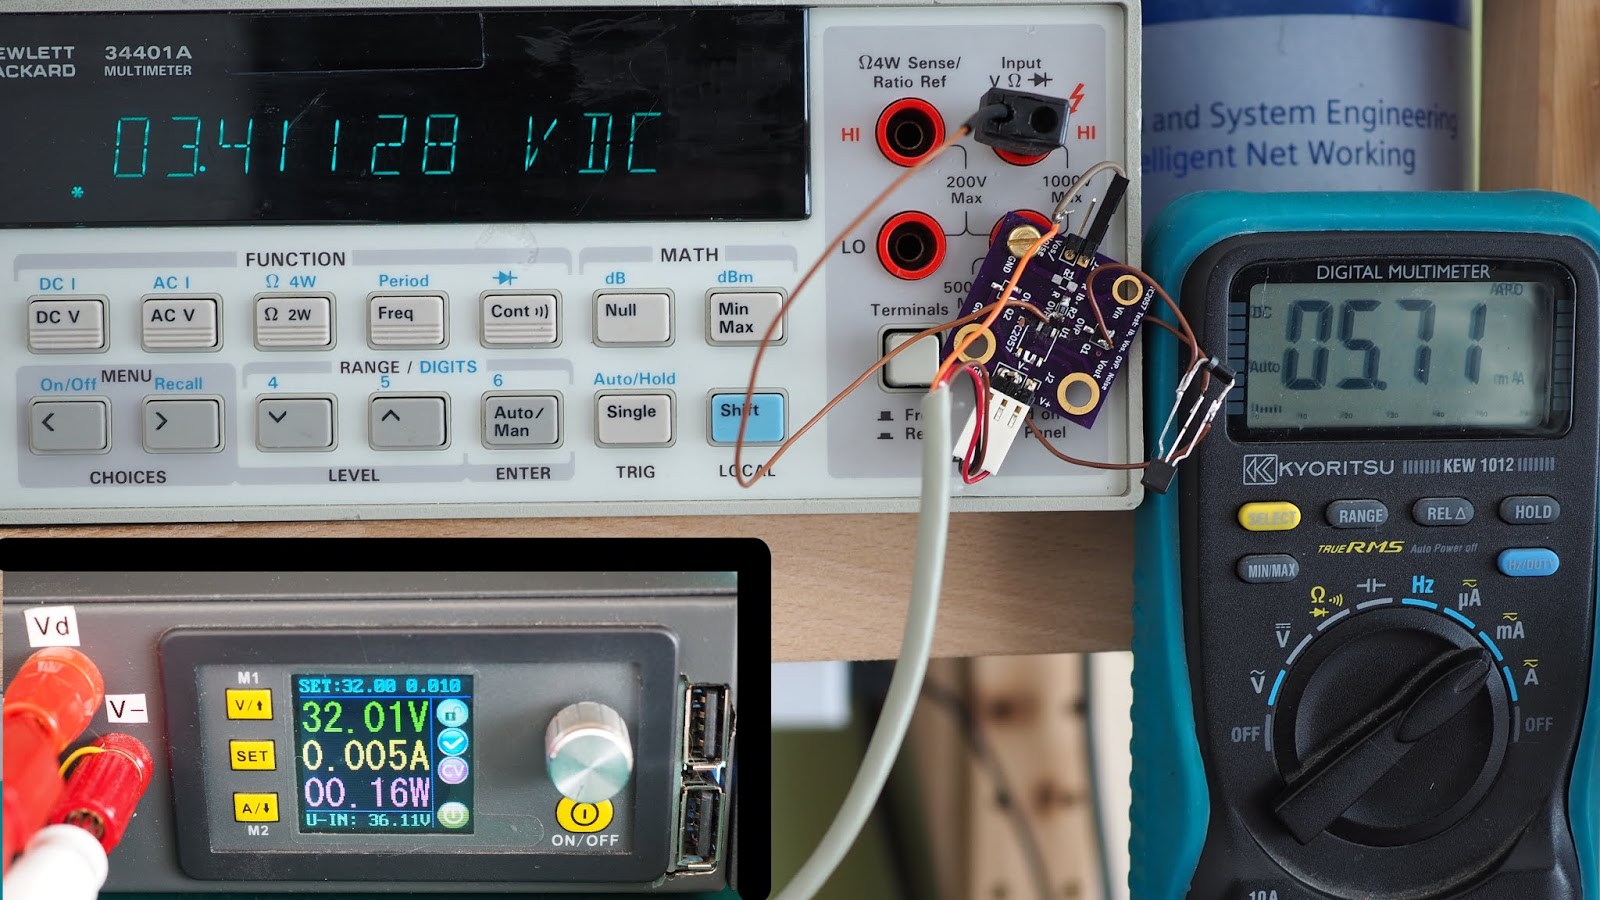
The PCB made for the op-amp test from the previous post was used for the test. I soldered two JFET MMBF4117 transistors for the over-voltage protection. The limiting resistor was 5K (2x10K in parallel). For the test with the current sink, I added an external PNP transistor and a diode.
 |
| Additional circuits for the current sink. |
I used two PSU:
- A small, custom made PSU which contains a Digital DC-DC Ruideng DPS 3003 with voltage range of 0-32V and two regulated LDO in the range of -/+ 1.3V to 30V. The DC-DC converter and the both LDO share same common ground.
- Analog HP 6237B PSU with dual polarity outputs +/- 23V and one single 18V output.


Since I do not have high voltage PSU, I had to set the power supply to much lower values +/- 2V and apply up to 32V input voltage.
Positive over-voltage test description:
- The power supply rails were set to +/- 2V using the LDOs- The input voltage was set from 0 to 32V with 1V step using the DPS 3003
- The following voltages and current I was monitoring: the positive rail V+ (Advantest R6581T), the clamp voltage Vclamp (HP 34401A), the input current through the limiting resistor I limit (Kyoritsu KEW 1012)
- The test was made two times: once with sink current circuits and without it.
 |
| Test without the current sink circuit. |
 |
| Test with the current sink circuit. |
The pictures show when the current sink circuit is used, the current which flows through the diode and goes to the common ground. This is visible in the current measurement of the DPS 3003. When the current sink circuit is not used, the current is "missing" on the DPS 3003 display, but the KEW 1012 multimeter shows that it actually exists. The test results show, that this extra current is the reason for increasing positive power rail.
And here are results from the test:
The red solid line is voltage on the positive power rail with current sink circuit. The voltage was stable at 2V during the whole ramp-up.
However, if we look into the blue solid line (without current sink), we can see during ramp-up of the input voltage went from 21 to 32V, the positive power supply was increased from 2V to 2.7V. The dependency is very linear and will be further increased if we continue to rump-up.
The same linear increasing of the voltage is observed for the voltage clamp when the current sink circuits is not used (the blue dash line). However, the red dash line which is the voltage clamping value with current sink circuit shows stable value across 21-32V range.
Using linear regression, I can estimate increasing the voltage clamp up to 4V for 40V input voltage and up to 6.3V for 75V input voltage when current sink circuit is not used. This can destroy the op-amp if there is not enough head-room of the power supply.
There is no difference in the current passes through the resistor and the diode. This is visible with the blue and red dot lines.

Negative over-voltage test description:
- The power supply rails were set up to +/- 2V using the HP 6237B PSU.- The input voltage was set from 2 to -30V with 1V step using the negative LDO.
- The following voltages and current were monitored: the negative rail V- (Advantest R6581T), the clamp voltage Vclamp (HP 34401A), the current through the limiting resistor I limit (Kyoritsu KEW 1012).

Here the negative power rail voltage is constant during the input voltage ramp-up. The clamp voltage is also relative constant after input voltage exceeds the power rail and diode's forward voltage.
Update 15 April 2021:
I got a mail from blog's reader with a link to Maxim's Application Note 4035 about "Overvoltage protection for sensitive amplifier applications". The interesting part is "Differential Diode Protection".
This is really interesting. I have a couple of handheld multimeters and was looking at buying a benchtop for higher accuracy. I might give this a shot before purchasing one. Thank you for this post.
ReplyDeleteInteresting. Thank you for posting. I've decided to use this in an OVP circuit for an ADC input. Can you tell me what the diode is for that goes from the emitter of the PNP to GND? Does is prevent reversed polarity across the PNP? Is it for start up / power down conditions? For my application the voltages are much lower (5V) so not likely to break the PNP. Thank you
ReplyDelete